
Accessing and Using iRIS
Accessing and Using iRIS
iRIS is San Diego State University’s secure, web-based platform for managing research compliance submissions. Designed for Principal Investigators and research teams, iRIS streamlines the submission, review, and tracking of studies requiring Institutional Review Board (IRB), Institutional Animal Care and Use Committee (IACUC), and Institutional Biosafety Committee (IBC) approval. With iRIS, researchers can easily submit protocols, respond to reviewer comments, and maintain compliance—all in one centralized system.
First time users with an SDSU email do not need to request a new account

iRIS Frequently Asked Questions
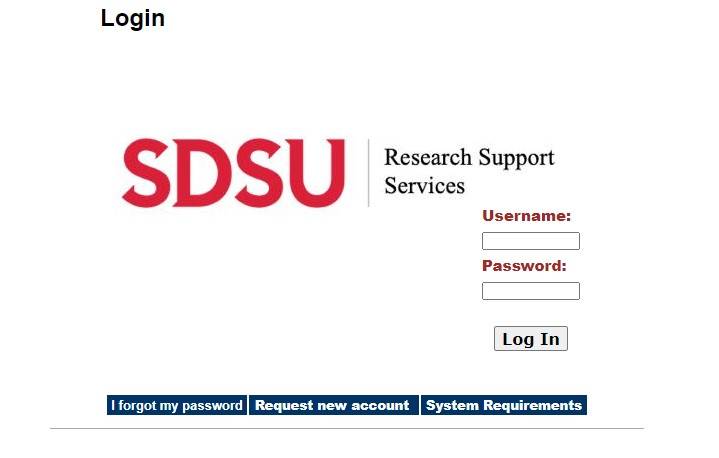
- In your web browser, go to iRIS at sdsu.imedRIS.net
- Login to the iRIS system using your SDSUid and Password, even if you are a first time user
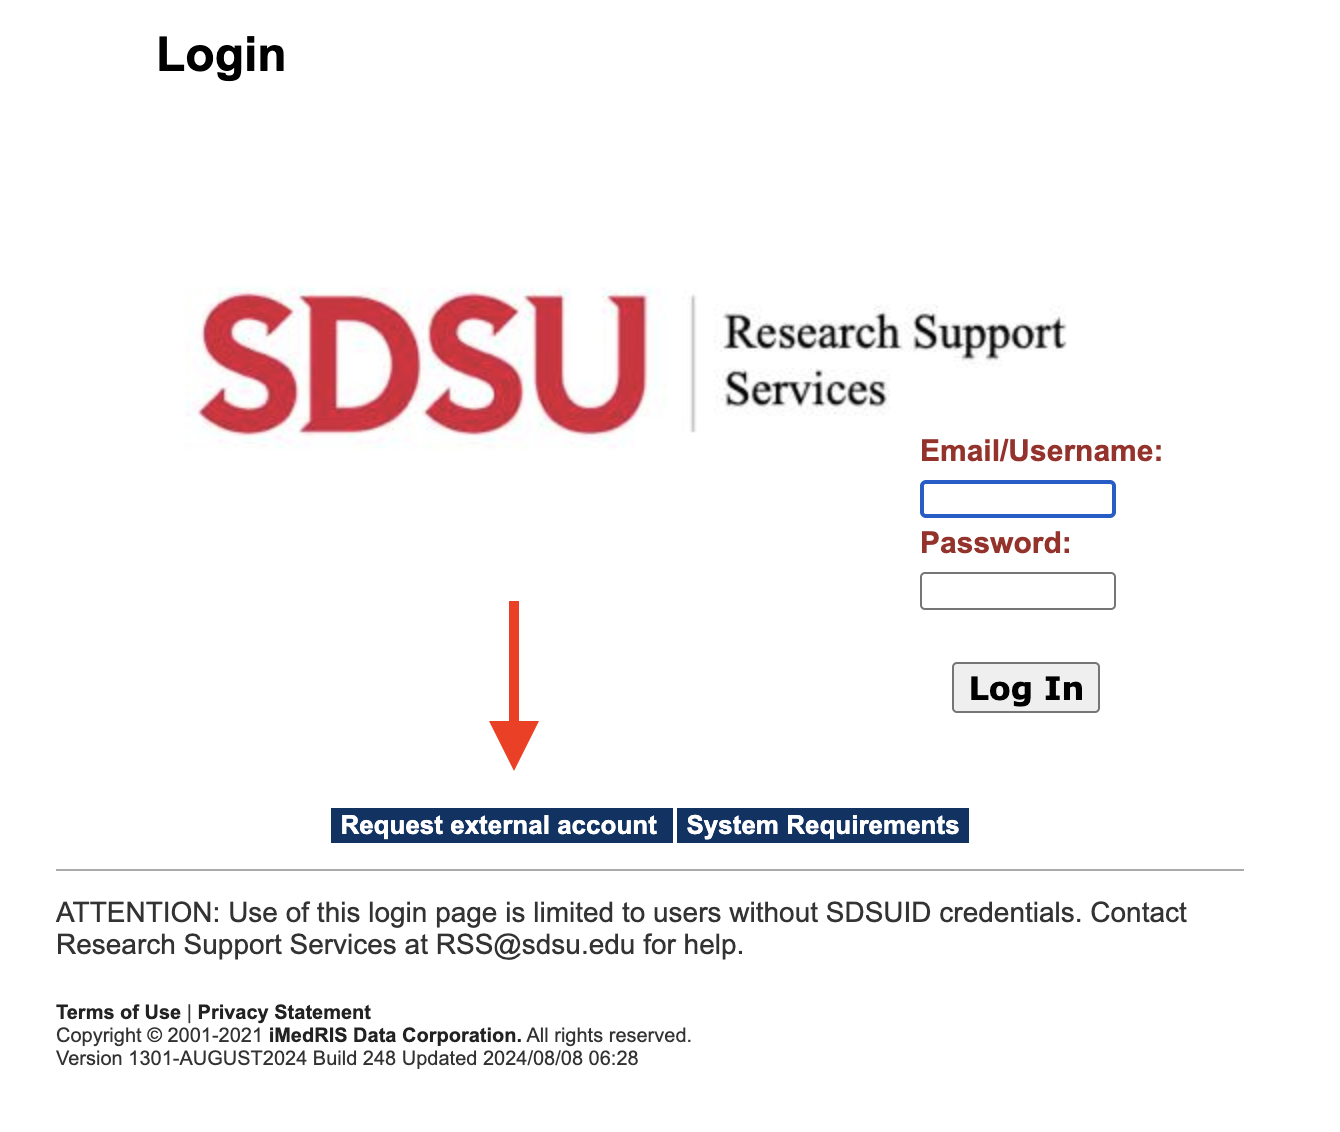
What if I do not have an SDSU account?
- If you do not have an SDSU affilated account you can request a new account
- In your web browser, go to https://sdsu.imedris.net:444/
- Once at the login page, click on Request External Account.
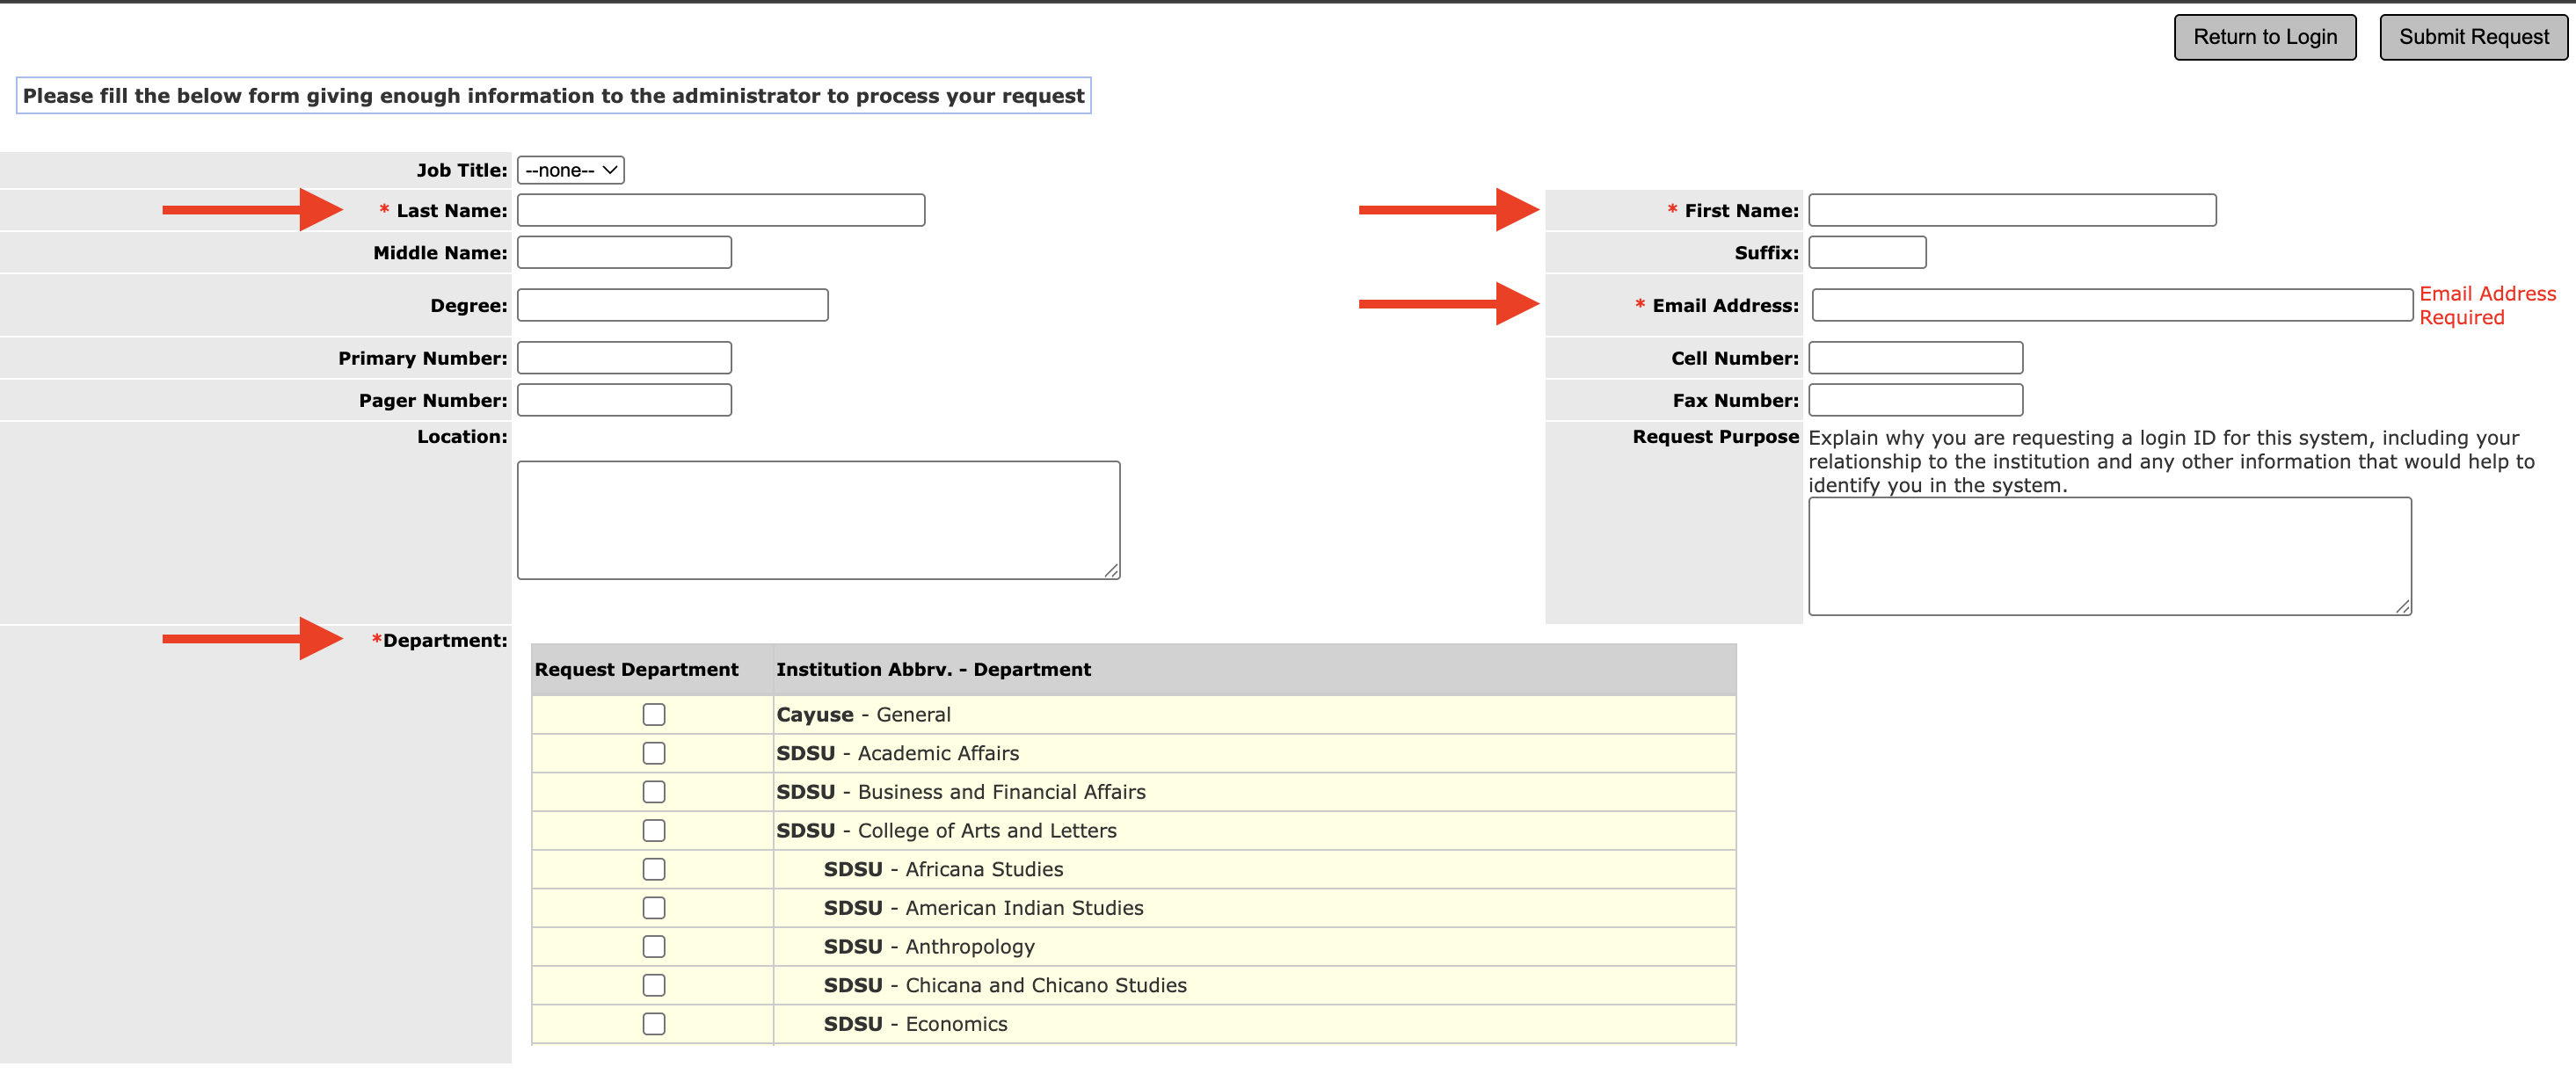
- Provide your first and last name, email address, and SDSU affiliation (name of PI or lab, study or protocol number)
(The Research Support Services team will approve this request, which may take up to 24 hours.)
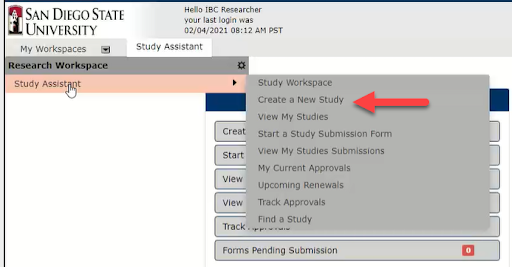
- Under My Workspaces (top left corner), hover over Study Assistant, then select Create a New Study
- Select the applicable application

-
The form is a smart form and will show appropriate questions based on your previous answers.
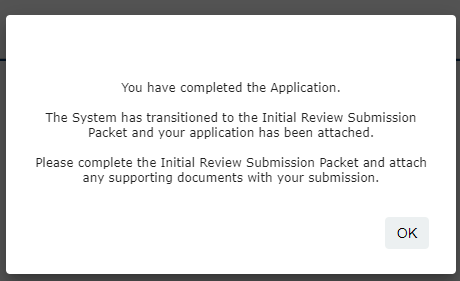
Once you have completed all of the form questions, you will see the notification below. Select OK
-
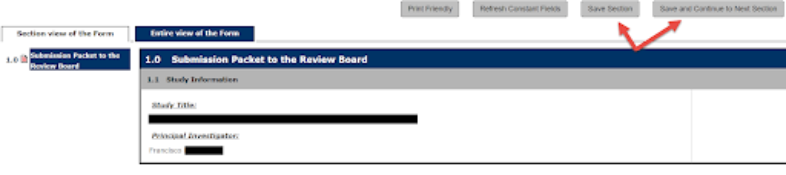
You are now viewing the Submission Packet to the Review Board. Here you can review the materials that will be sent to the Review Board. Select Save and Continue to Next Section to continue.
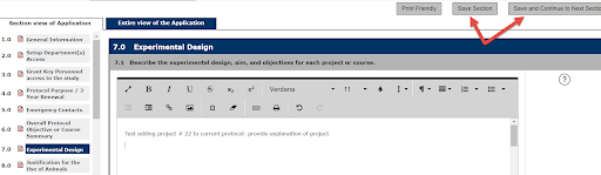
Under 2.0 Study Application, you can select Edit/View to edit or view the application that you just completed. Otherwise, select Save and Continue to Next Section to continue.
Under 3.0 Other Attachments, you can attach any additional documents to the review board such as permits, training documents, recruiting materials or Exposure Control Plans. Select Save and Continue to Next Section to continue.

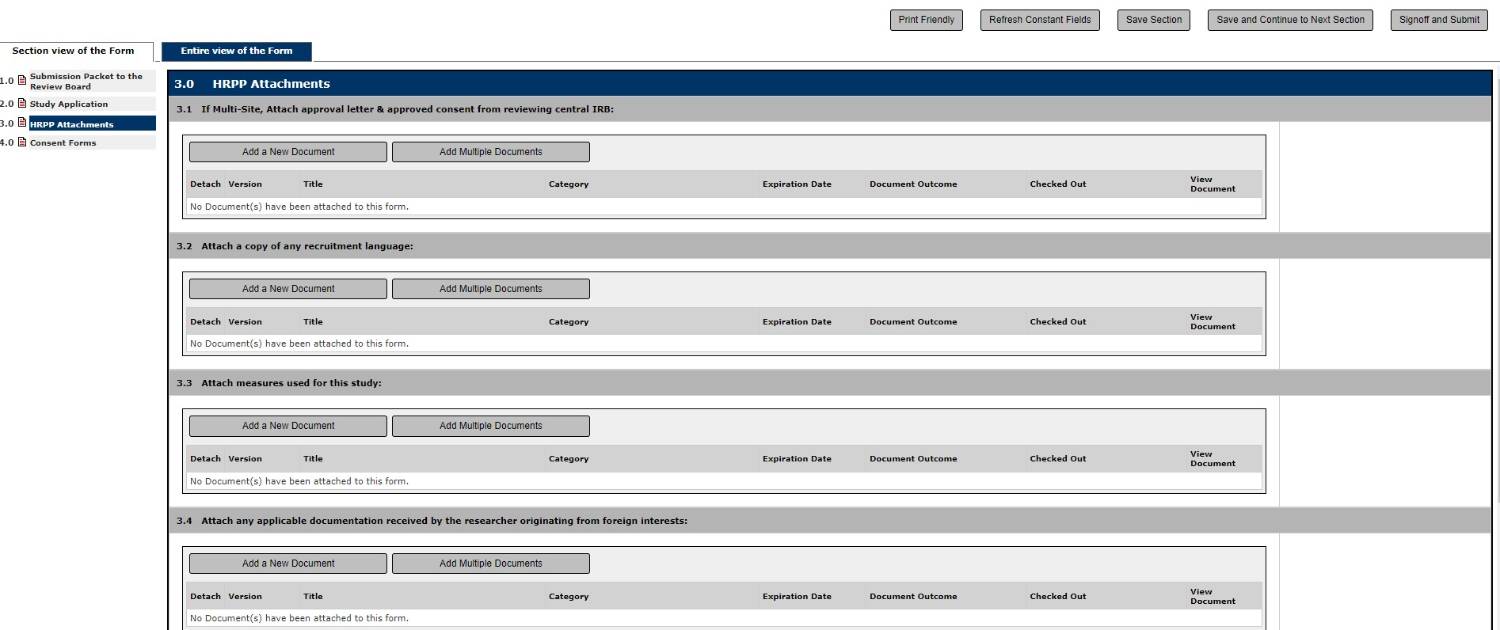
IRB initial applicants, Under 3.0 HRPP Attachments, you can attach your reliance agreement with a reviewing IRB, participant recruitment material (i.e. fliers), Measures, any documents relating to foreign investigators, or Data Management Plans, as well as any other relevant documentation.
Under 4.0 Consent Forms, you can attach any materials that will be used to consent participants. It also includes a template builder for various participant groups and consenting situations.
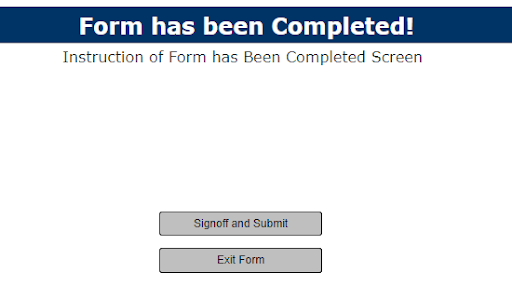
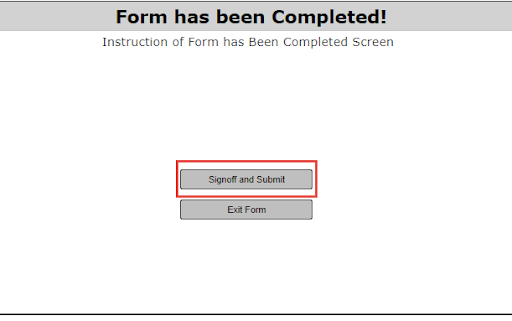
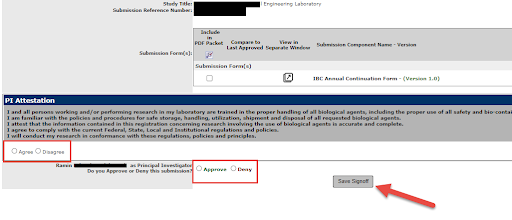
- If you are the PI, you will see an option to Sign off and Submit. If you are not the PI listed on the application, you can exit the form and the system will send a message to the PI to Sign off and Submit.
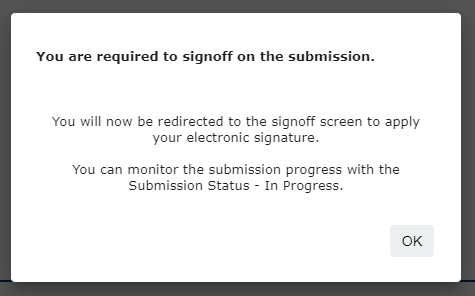
- Select OK
-
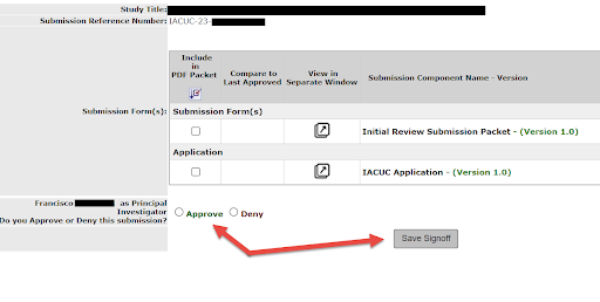
You can view each item in a separate window by clicking the arrow next to the submission forms.
In order to submit the form, you must answer the PI attestation, approve the submission, and click Save Sign off.

- Once completed, the application can be viewed under Studies Submission Status - In Progress
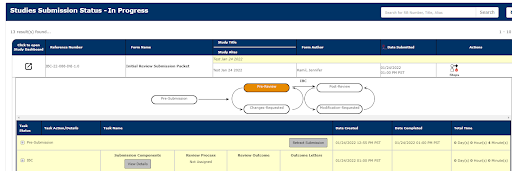
- The study will be routed to the an analyst of the relevant review board. Any comments from the analyst or review board will be communicated via an email from iRIS
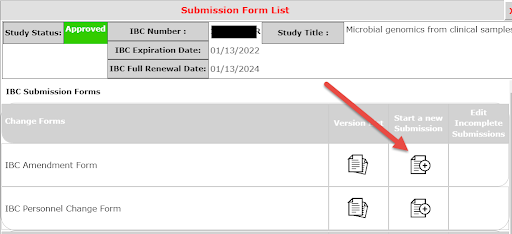
Annual Continuations, Continuing Reviews, Amendments, Adverse Events, Reportable Events and Personnel Change Forms can be submitted for each study in iRIS.
- Find the appropriate study and click Forms

- A pop up window will appear. Select the appropriate form to start a new submission.
- Complete the form sections as needed. Once the form is completed, if you are not the PI, a message will be sent to the PI to Signoff and Submit the Form. If you are the PI, you will automatically be taken to the Signoff and Submit page to submit the form to the appropriate committee.
-
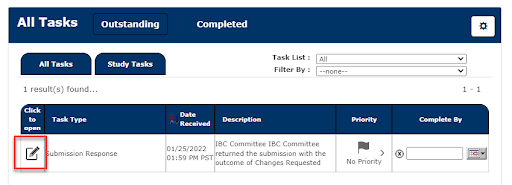
Under Tasks, the PI will receive a task stating that changes have been requested
-
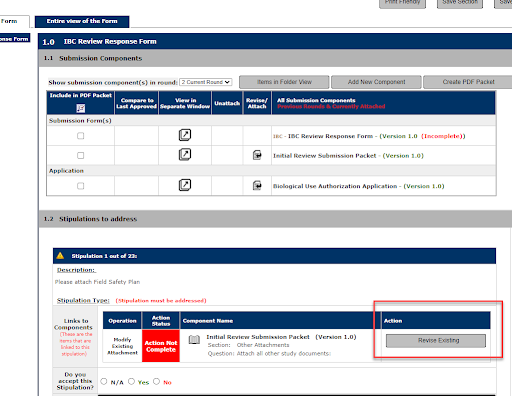
This will take you to the Review Response Form. You can revise the application by clicking Revise Existing.
Reviewer comments are called Stipulations. Each stipulation is listed under 1.2 Stipulations to Address
-
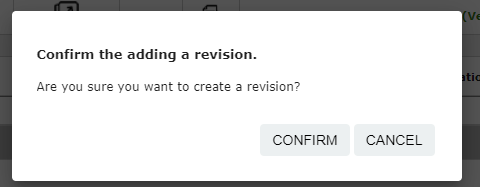
Select Confirm to create a revision
-
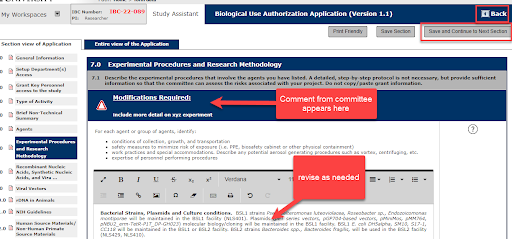
Make revisions directly in the application. The system will track changes.
You can select Save Section and Back to return to the Review Response Form to select the next stipulation.
5. In the Review Response Form, select Complete Action to indicate that the stipulation has been reviewed and revised. Indicate whether you accept the stipulation and provide a text response to the stipulation.
Note: each stipulation must have a text response and cannot be left blank.
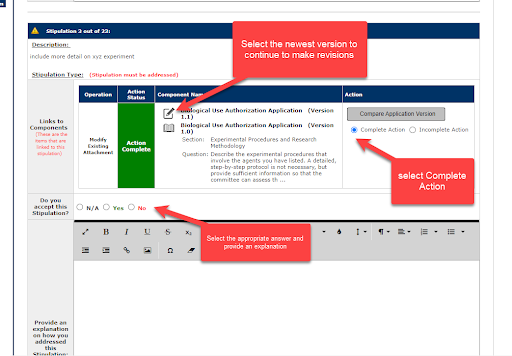
Note: For best results, respond to each stipulation individually. Once the revision has been made, save the section and go back to the Review Response Form.
-
Once all stipulations have been addressed, select Save and Continue to Next Section
-
The PI will then be directed to sign off on the submission.
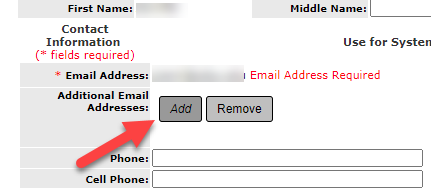
If you have registered to CITI with any email address other than your @sdsu.edu email address (ex. @mail.sdsu.edu), you can add an alternate email address to link your iRIS account with your CITI account.
-
In the upper right hand corner, click on My Profile > My Account
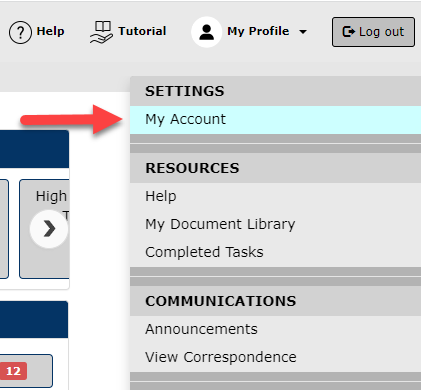
-
Under Additional Email Addresses, click Add
-
3. Enter the additional email address and click Submit.
-
4. Click Save Changes
Note: You can choose to use the additional email address to receive system notifications from iRIS, if you prefer.
You can delete a form if the Review Board has not started processing it yet.
- Go to My Studies and open your study.
- If necessary, retract the submission you want to delete by clicking on the Retract Submission button and then click OK.
- In the Submission Form column, click on the name of the form you want to delete (i.e. Amendment Form).
-
You will see a list of forms you have submitted. Check the box next to the form you want to delete and click the Delete Selected Form button.

Note: If the IRB has returned the submission for corrections, the form must be denied administratively in order to be removed.
Anyone can fill out the study application, but the PI must sign off on and submit a new study. The PI must also sign off on and submit the Continuing Review Form. All other study submissions can be submitted by investigators, co-PIs, co-investigators, or study contacts who are listed in section 3 of the initial Application.
Important Note: Only individuals listed in section 3 of the initial Application will have access to the study (via My Studies) after it is submitted. If you are not Key Study Personnel but need access to the study, be sure to add yourself as a study contact.
- Go to View and Manage my Studies
-
Select the study

-
Then select the Study Management tab

-
Select Key Personnel

-
All Key Study Personnel (PI, co-Investigator, Research Staff, Faculty Adviser, Study Contact) that has been named for the protocol will be listed.

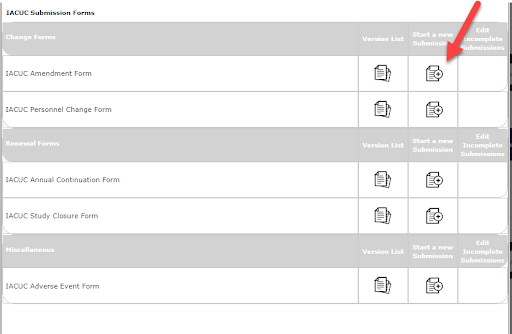
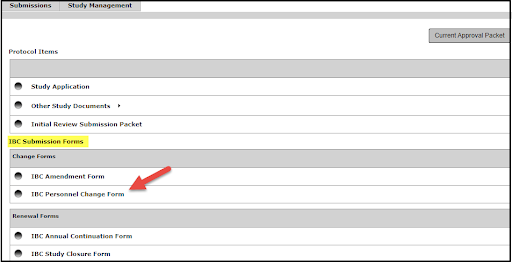
There are a few ways to access Forms:
-
Open the protocol of interest and Select from the Submission Form options below
Then select Add a New Form from the options on the right (then scroll to step 3)

or
-
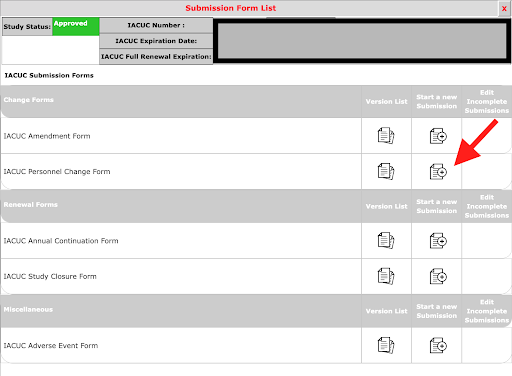
Locate the BUA, IRB or IACUC record you want to amend/update and select Forms from the study dashboard.

Select IBC, IRB or IACUC Personnel Change Form from the Forms list.

or
-
Select the Start a Submission Form for one of My Studies from the Featured Study Operations list.
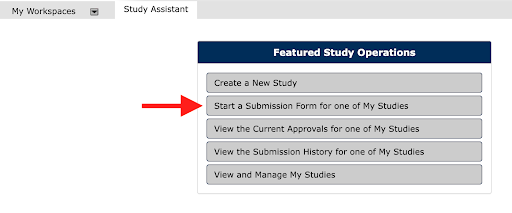
Click on the Select a Study icon for the protocol you want to amend/update
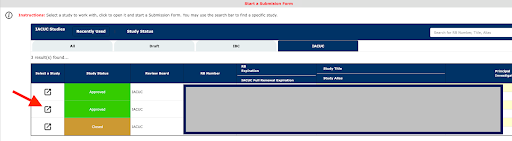
Select the form you want to submit against your protocol (Personnel Change Form).
On the Personnel Change Request
-
Select the option for Other Study Personnel, then select Setup Key Study Personnel Request

-
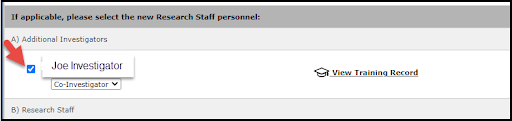
If adding personnel, enter the personnel last name and then select the Find User/Search Directory button. Personnel info will display, select to add.
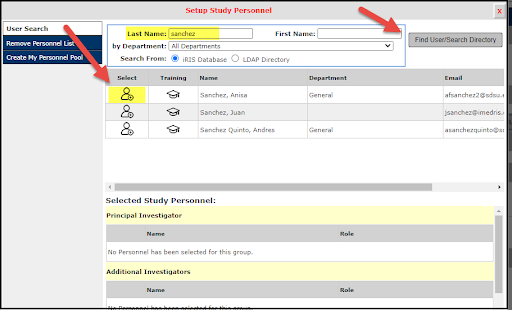
If removing personnel, select that option on the left and then select the name of the person you would like to remove from the protocol then proceed through the steps.
-
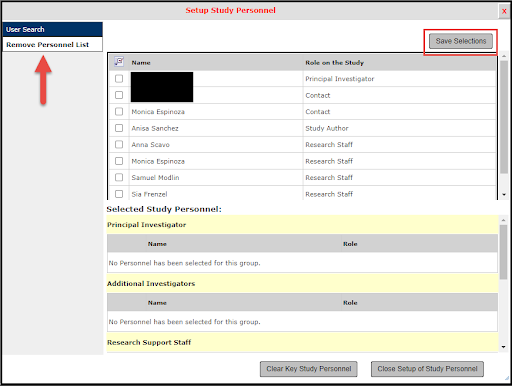
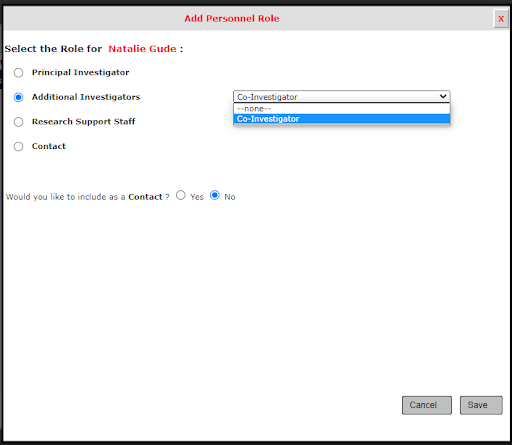
Select appropriate personnel option from drop down menu
- Additional Investigators, if adding Co-Investigator
- Research Staff, if adding Students or program coordinators
- Contact, for personnel who will submit forms against your protocol
Then click the Save button below.
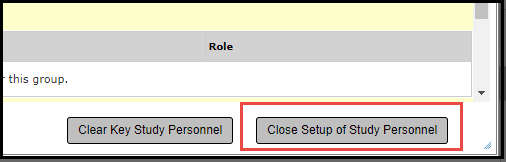
-
Once you add the personnel, click the button below for Close Setup of Study Personnel.
-
Check the box next to the personnel name and select Save and Continue to move through the prompts to the PI Sign Off.
Submission tracking is incredibly easy in the iRIS system.
- Go to the View the Submission History for one of My Studies section.
- Select the applicable study.
- View the Details next to the Reference/Study Number to drop down the work flow chart.
You will be able to see which analyst has been assigned to process the submission. If the submission has been assigned for review, you also will be able to see that information. You can contact the assigned analyst for more information.
Yes. Open the form and click on the "Printer Friendly" button. You can then choose to print the form as an HTML form or a PDF form. Select "PDF Form" to save the form as a PDF.
Study contacts are copied on all important email notifications that the PI receives, including requests for submission corrections, approval letters and continuing review reminders. You can add as many study contacts as you’d like in section 3 of the Initial Application.
If you click to open your protocol and nothing happens, check your pop-up blockers.
Many browsers, including Chrome, Edge, Internet Explorer, FireFox, and Safari have pop-up blockers such that most pop- ups never appear. Some toolbars (like the Google Toolbar) have pop-up blockers in them too.
Configure Pop-Up Blockers
Several features in iRIS rely on pop-ups, so you will need to configure your browser to allow pop-ups if you use the most current versions of Chrome, Edge, Internet Explorer, Firefox, or Safari
To ensure that pop-ups are allowed in iRIS, use the following steps to manually check your pop-up settings.
*Note: Other pop-up blockers from third party vendors and Internet Service Providers exist but are too numerous to list here.*
Chrome and Edge
When blocking a pop-up, Chrome and Edge display an icon in the address bar

When you click the icon in the address bar, a menu will display the following choices:
- A clickable link of the pop-up.
- Always allow pp-ups and redirects from <site link>
- Continue blocking
*It is recommended to allow pop-ups for the website if the website is trusted (such as iRIS)*

Firefox
In Firefox when you log into iRIS, you may see an information bar which is just above the web page content and below the toolbars. This bar may warn you that a pop up has been blocked.

Click on this bar and choose Options to configure Firefox to allow pop-ups. You will see a menu displayed that has the following choices:
- Allow/Block pop-ups for this site
- Edit Pop-up Blocker Preferences
- Don’t show this message when pop-ups are blocked
- Show <site address>
*It is recommended to allow pop-ups for the website if the website is trusted (such as iRIS)*

You may then also have to select the downloads in the address bar to find the item you wish to see.

macOS
Safari
When blocking a pop-up, Safari displays a message and an icon in the address bar.
Clicking the message or icon will open the blocked pop-up.
To permanently allow pop-ups, with the site you would like to allow pop-ups open, go to Safari > Preferences > Websites. On the left, scroll down and select Pop-up Windows.
Under Currently Open Websites, select the appropriate site and change the drop down to Allow.
Firefox
Add the URL (web address) for the iRIS entry page to the list of allowed sites. You can do that by selecting Settings in the Firefox menu, selecting the Privacy and Security tab, go to Permissions selecting the Exceptions button next to Block pop-up windows, and pasting in the URL: https://sdsu.iRIS.net/
- Click the menu button and select Settings.
- Select the Privacy & Security panel.
- Go down to the Permissions section.
- Click the Exceptions… button to the right of Block pop-up windows to open a dialog box to choose which sites are allowed to display pop-ups.
- Type or paste https://sdsu.imedRIS.net/ and click the Allow button to add it to the list of sites that will be allowed to open pop-up windows.
- Click the Save Changes button to apply your changes.
Study Statuses
The overall study has a status in iRIS. Here are what these statuses mean and some important notes about the statuses. You can also check the Submission History if you need more detail about where the study is at in the review process. The study status automatically updates from "Draft" to "Pending – Submitted for Initial Review" once you submit the study to the IRB. If the study status is green, the study is Approved or Active and can be conducted as described in the application.
Draft
The study has not been submitted and is still in draft mode.
Approved
The study is active and approved by the IRB. It has also been determined to be an expedited or full board study.
Active - Data Analysis Only
The study is still active however a continuing review or follow up form has been submitted, stating the study is currently only analyzing data.
Active - Closed to Enrollment
The study is still active however a continuing review or follow up form has been submitted, stating the study is currently not open to recruitment.
Closed
The study has been closed.
Exempt
The exempt study is active and approved by the IRB.
Expired
The status will also automatically change to "Expired" once the expiration date is reached and the study has not been renewed via CR.
Not Subject to IRB Review
An SDSU IRB Member has screened the submitted proposal and determined the study does not meet the federal regulations of human subjects research. While IRB permission is no longer required, there maybe other regulatory hurdles to clear.
Pending
The study has been submitted. Check the submission history for more information on the study status/workflow tracking.
Pending - Submitted for Initial Review
The study has been initially submitted.
Returned for Corrections
The IRB has returned the study for revisions or clarifications after formal review. Look for the Submission Correction task on your home screen.
Returned for Corrections - Tabled
The IRB has returned the study for revisions or clarifications after a full committee review.
No, turn off tracked changes before uploading your consent form.
iRIS includes an internal document comparison tool. You and the IRB can use this tool to see what changes were made in different versions of the consent form if you submitted MS Word documents.
To use this tool, open your study via My Studies. Click on the “Informed Consent” link from the study management dashboard. Click on the folder icon to see all of the versions of a particular consent document. Check the boxes next to the two versions you want to compare, and then click “Compare Consent Versions” button.
The comparison tool can also be used to compare different versions of the IRB Application, submission forms (such as the Modification Form) and Word versions of Other Study Documents.

Human Research Protection Program Guides
See our How to Guide for more information.
See our How to Guide for more information.
See our How to Guide for more information.
The consent process that takes place between an investigator and participant must be captured in a document called an “informed consent form”, or “consent form.”
Ordinarily, all research participants must indicate in writing their willingness to participate in research by signing an informed consent form. However, signed consent may not be necessary or appropriate in certain studies, such as surveys, interviews and other minimal risk research, or in research where the participants are to remain anonymous. In these cases, the IRB gives an investigator permission to alter the consent process (waiver of signed consent), and the investigator should prepare an information sheet appropriate for the study.
Federal regulations identify certain specific elements required for informed consent. Depending on the nature of the research, the IRB may require additional elements.
There are several templates located in the help page (top right corner) of iRIS, and the Informed Consent section of the IRB Submission Packet.
After the study is approved, get the approved consent form translated and submit it via an Amendment Form.
- Select the Translation of Previously IRB-approved Documents option.
- Upload the documents under Revised Materials.
See the Translation of Consent Documents Policy for more information.
Submit a Continuing Review Form, against your study, and select Study Closure- all research activities are complete under Study Status. Fill in the remaining information to assist our analysts process your submission.
IACUC/IBC Guides
-
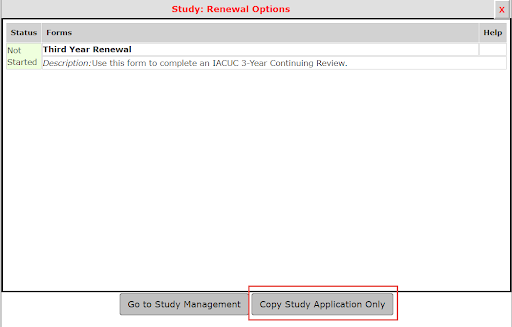
Once logged in, on the dashboard, you should see the task inform of your pending 3rd year renewal:

-
After selecting Click to open, a pop window will appear, select Copy Study Application Only. This will allow you to utilize your previously submitted APF/BUA application to make any revisions; you do not need to complete a brand new application in the system.
-
This step is where you are now able to make edits to your original application that apply to your renewal. If there are no changes, you may still review and continue through the sections using the Save & Save and Continue to Next Section buttons.
-
Once you have updated/made the necessary changes to your APF/BUA application, you will be prompted to continue through the submission process. You can complete this step also using the Save & Save and Continue to Next Section buttons.

-
After you select Sign off and Submit, a new screen will appear to verify your submission items. The PI must complete this step. They are the only ones who can approve the final sign off of any submissions in iRIS.
-
Once you have completed all of the above-mentioned steps, the renewal will now be pushed over to the IACUC/IBC queue for processing. They will be in touch if any further information is needed.
-
Locate your appropriate Study, then select Forms

-
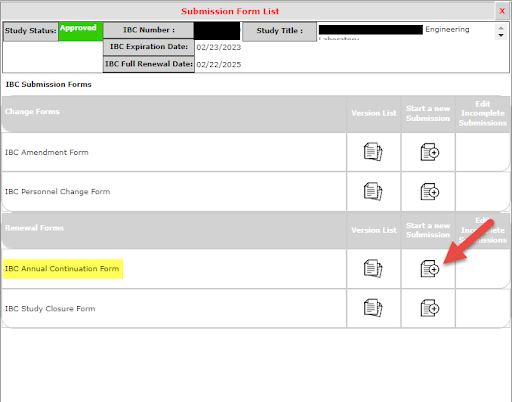
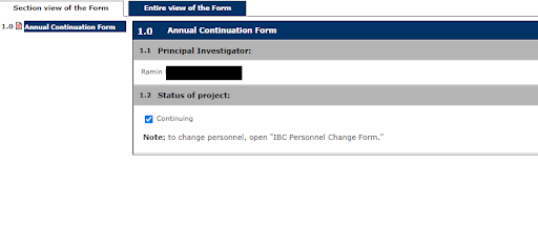
Under Renewal Forms, select IBC Annual Continuation Form (Start a new Submission)
-
Check the box marked Continuing, if the project is still ongoing
-
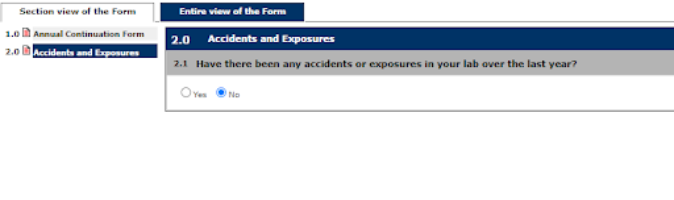
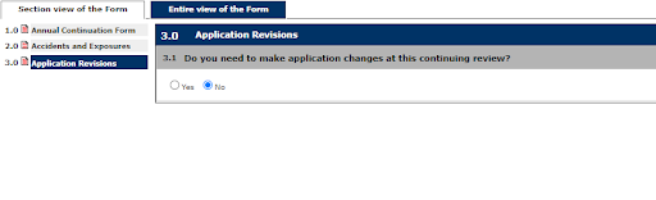
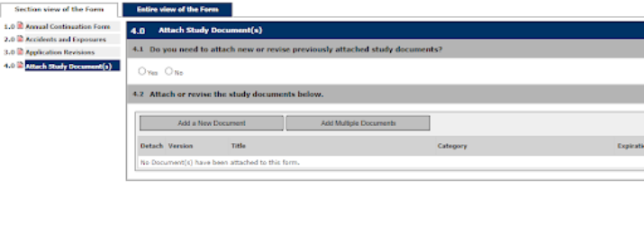
Continue through the prompts selecting the appropriate answers as they pertain to the continuation of the Study
Note: This is an example of a BUA form; prompts will be different for an APF through the IACUC.
-
Select option to sign off and submit Continuation
-
This step can only be done by the PI listed on the Study. They have to agree and approve the submission of the Continuation; then select Save Sign off.
-
This will now be pushed to the IBC queue for processing. They will be in touch if additional information is needed.
-
Select Forms from Dashboard Actions

-
Under IACUC/IBC Amendment Form, select Start a new Submission
-
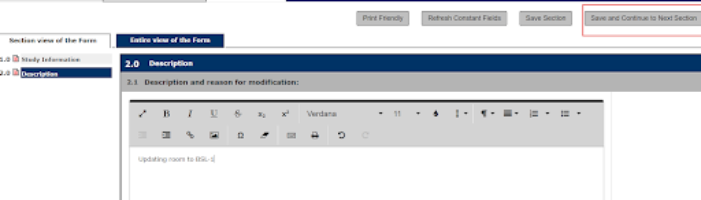
Save and Continue through sections. Enter appropriate description stating a reason for the Amendment
-
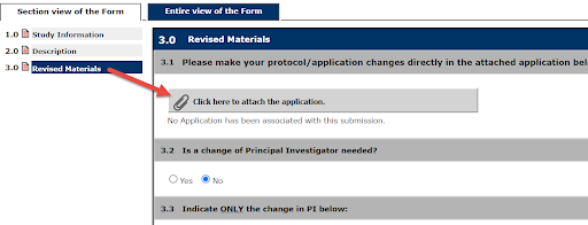
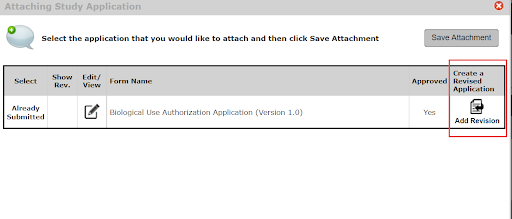
When you get to Section 3.0, Revised Materials, it’s important to select Click here to attach the application, this prompts the system to pull up the originally submitted application to allow for revisions to be made
-
Next, you will select Add Revision
-
This now gives you access to the originally submitted application where you are able to edit/make changes. You can advance through the sections using the Save and Continue to Next Section button to ensure your changes are being captured.

-
Once you are done, make sure to select Save and Continue to Next Section. This will complete the application, and move it on for the PI to sign off (this step only the PI is able to do)
-
Once they sign off, the system will push it over for us to review and process.
Need Help? Contact Us
iRIS System Support:

Justin Dean
Administrative AnalystIRB/Export ControlResearch Support Services[email protected]619-594-6622GC 4503K
Jessica Rattazzi
Administrative CoordinatorIACUC/IBCResearch Support Services[email protected]619-206-4490